Salesforce
Note:For technical documentation, including information about connecting to Zuar Runner to Salesforce with SSO, please see the Salesforce Technical Documentation .
The Salesforce plugin enables Zuar Runner to pipe data from Salesforce and store the data in a database.

Prerequisites
Only certain Salesforce editions provide access to the Salesforce APIs.
See Salesforce editions with API access for more information.
Steps to create Salesforce jobs in Zuar Runner
To pipe data from Salesforce to Zuar Runner, following the steps below.
On the bottom left of your Zuar Runner screen, click on Add Job.
Click on the Salesforce connector.

On the next page, you will see a “Salesforce CRM Credentials” screen. Choose to use a new credential set or existing credentials from the SOURCE OF CREDENTIALS dropdown menu if they have already been created. If you Provide credentials now, to be saved under Credential Manager, give the credential set a CREDENTIALS NAME, select the desired CREDENTIAL TYPE, and complete the corresponding form.

In most cases, Salesforce uses username/password authentication plus either a Security Token or Whitelisted IP Address. If you have enabled SSO on your Salesforce instance, you will need to use the JWT Bearer Token and follow these instructions .
The security token is the easiest to use, especially if there are no other integrations with the specified account.
To obtain your security token (if you don’t already know it), open another browser and go to your Salesforce page.
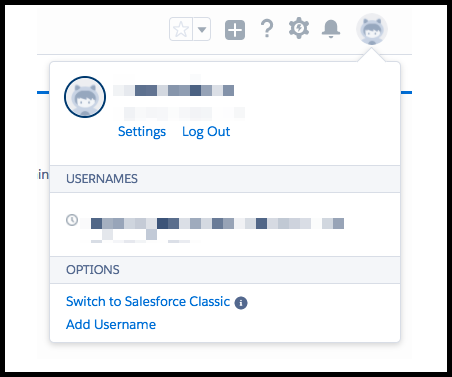
Click on your Salesforce profile icon on the upper right hand corner of the page.

Next, click on Settings.
Select Reset My Security Token in the left hand navigation.
Click the Reset Security Token button.
The resulting token will be emailed to the user
Note
By using a Saved Credential in Zuar Runner, this will allow you to easily update credentials in the future if you are required to change your password or generate a new token.
{
  "username": "username@domain.com",
   "password": "users_password",
   "security_token": "hfYHsr9gOkCfLH1pFK1GI9yLg",
   "sandbox": false
}
The other option is whitelisting Zuar Runner’s IP.
Click the gear icon in the upper right hand corner of Salesforce.
Select Setup.
In the Quick Find text box of the left hand navigation type: “Network Access”
Click New
Enter Zuar Runner’s hostname or IP
Whether you decided to take the security token route or the whitelist IP address route, make sure to enter in the information correctly in the Zuar Runner wizard. If you decided to take the whitelist IP route, make sure to click on the The IP address of this instance is whitelisted checkbox in order to input your organization ID.
Check Sandbox if your Salesforce instance is a sandbox instance.
After finishing up with this page, select Next. Zuar Runner will then authenticate against your Salesforce instance with the provided credentials and look for all available endpoints.
On the next screen, specify the output of your data.
Title: The name of the sequence that will store all of your Salesforce jobs.
Use Default Database URI: Internal Zuar Runner PostgreSQL database. When unchecked, you have the ability to specify the database with a connection string of the destination database
Schema: Optional output schema in the database. Empty means default.
Table Name Prefix: Optional prefix to be used before each Salesforce table name After this, click Save.
API Version: Version of Salesforce API to be used. This can be important for particular endpoints that may only be available in certain version of the Salesforce API.

Congratulations! You have just added Salesforce to Zuar Runner. Next, you will want to schedule your Salesforce job(s). Learn how to schedule your job here.
Customize Salesforce Zuar Runner Jobs
Using SOQL queries
By default, a Salesforce Zuar Runner job will pull all records from a Salesforce object. In SOQL, Salesforce Object Query Language terms this is the equivalent of:
SELECT * FROM {object};
Salesforce SOQL doesn’t actually allow SELECT *, so Zuar Runner ends up describing
the Salesforce object and adding every column to a SOQL query.
For example:
SELECT Id,IsDeleted,AccountId,RecordTypeId,Name,Description,StageName,Amount,... FROM Opportunity;
The default input of a Salesforce Zuar Runner job config looks like this:
"input": {
        "credentials": {
            ...
        },
        "sobject": "Opportunity",
        "upsert_field": "SystemModstamp",
        "use": "sfdc.iov2#SalesforceInput"
    },
If you want to send a specific SOQL query to Salesforce instead, you can edit
the input of the job and add a new parameter soql:
"input": {
        "credentials": {
            ...
        },
        "sobject": "Opportunity",
        "soql": "SELECT Id,IsDeleted,AccountId,... FROM Opportunity;",
        "upsert_field": "SystemModstamp",
        "use": "sfdc.iov2#SalesforceInput"
    },
This method is useful if you want to limit the date range of the SOQL query or if you need to limit the columns being pulled by Zuar Runner.
One important caveat with using specific SOQL in the Zuar Runner job: Zuar Runner is only sending this exact SOQL query. Later on if you need columns that aren’t in the SOQL query, you need to add them manually to the Zuar Runner job. Without SOQL, Zuar Runner automatically adds all new columns.